MicMacRoom Tutorial: 04 Zhenjue : Différence entre versions
| (7 révisions intermédiaires par le même utilisateur non affichées) | |||
| Ligne 1 : | Ligne 1 : | ||
| + | [[Image:picto-liste.png|25px|link=Tutorials]] [[MicMacRoom Tutorials|Tutorials index]] | ||
== Tutorial Zhenjue == | == Tutorial Zhenjue == | ||
| Ligne 33 : | Ligne 34 : | ||
==== 3) Relative Orientation ==== | ==== 3) Relative Orientation ==== | ||
| − | TapiocaAll | + | '''TapiocaAll''' |
To search for attachment points, use the TapiocaAll node (use Tapioca with All commands authorized) to access them by right-clicking in the "Graph Editor" window > micmac > tapiocaAll | To search for attachment points, use the TapiocaAll node (use Tapioca with All commands authorized) to access them by right-clicking in the "Graph Editor" window > micmac > tapiocaAll | ||
(or right click in the "Graph Editor" window and type the node name in the search bar at the top) you get a block. Then link the MicMacProject Project Directory to TapiocaAll. You change the Image Size settings which define the resolution of the image (how high we want our resolution to be) and the Homol directory to set the output name of the file. This block allows you to calculate the connection points for all images in a given resolution. | (or right click in the "Graph Editor" window and type the node name in the search bar at the top) you get a block. Then link the MicMacProject Project Directory to TapiocaAll. You change the Image Size settings which define the resolution of the image (how high we want our resolution to be) and the Homol directory to set the output name of the file. This block allows you to calculate the connection points for all images in a given resolution. | ||
| − | + | [[Image:TapiocaAll.PNG|center|thumb|1000px]] | |
| − | tapas | + | '''tapas''' |
| − | For this dataset, | + | For this dataset, the images have different focal length, so we first need to calculate an orientation for the 24mm focal length images. to click to access it right in the "Graph Editor" window > micmac > Tapas you obtain a block. Then link the Project Directory, Image Patern, Homol Directory of TapiocaALL to Tapas you modify the Calibration Model parameters on RadialStd and you must go to the avencer parameters (node -tapas at the top right click on the 3 small dots > Filter Attributes > check Advanced) then choose in Ec Init max 30 and min 20 |
| − | + | ||
| − | + | ||
| − | + | ||
| − | + | ||
| − | + | [[Image:Advanced.PNG|center|thumb|1500px]] | |
| + | [[Image:Tapas.PNG|center|thumb|1000px]] | ||
| − | tapas_2 | + | '''tapas_2''' |
Check residual and number of points used per images. | Check residual and number of points used per images. | ||
| Ligne 59 : | Ligne 57 : | ||
image | image | ||
| − | AperiCloud | + | '''AperiCloud''' |
We will now generate a sparse cloud to visualize the relative orientation. | We will now generate a sparse cloud to visualize the relative orientation. | ||
To carry out this action we will take the AperiCloud node to access it right click in the "Graph Editor" window > micmac > AperiCloud you obtain a block. Then link the Project Directory, Image Patern, Homol Directory and Orientation Directory of Tapas_2 to AperiCloud no changes to be made to the parameters | To carry out this action we will take the AperiCloud node to access it right click in the "Graph Editor" window > micmac > AperiCloud you obtain a block. Then link the Project Directory, Image Patern, Homol Directory and Orientation Directory of Tapas_2 to AperiCloud no changes to be made to the parameters | ||
| − | + | [[Image:AperiCloud.PNG|center|thumb|1000px]] | |
| + | |||
| + | |||
| + | '''SaisieMasqQT ''' | ||
| + | |||
| + | To set a mask for dense correlation, use CommandMasqQT. Here we establish a 3D mask: | ||
| + | To perform this task, navigate to the SeizureMasqQT node. Right-click in the "Graph Editor" window > micmac > SaisieMasqQT to generate a block. Then connect the Sparse point cloud to the file path and both directory projects, from AperiCloud to SaisieMasqQT, with no settings changes needed. | ||
| + | |||
| + | [[Image:SaisieMasqQT.PNG|center|thumb|1000px]] | ||
| + | |||
| + | |||
| + | '''C3DC''' | ||
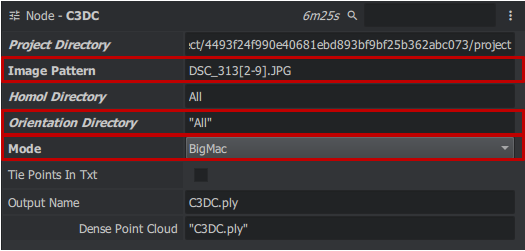
| − | + | The new C3DC tool works without requiring a master image for 3D reconstruction. To complete this task, follow these steps: First, navigate to the C3DC node by right-clicking in the Graph Editor window > micmac > C3DC, which creates a block. Then, establish the connections as follows: Output file to Masq 3D and the two projects directory from SaisieMasqQT to C3DC. Next, adjust the settings in MicMac: in Image Pattern, set "DSC_313[2-9].JPG", go to advanced settings, check Custom ZoomF and set Zoom F to 4. Finally, in Output Name, set the output file wish. name. | |
| − | + | ||
| − | to | + | |
| − | + | ||
| − | + | ||
| − | + | [[Image:C3DC_micmac.PNG|center|thumb|1000px]] | |
| − | |||
| − | + | [[Image:Zhenjue_Template.PNG|center|thumb|1500px]] | |
| − | + | ||
| − | + | ||
Version actuelle en date du 29 avril 2024 à 13:32
Sommaire
Tutorial Zhenjue
Summary
Description
This tutorial focuses on independently reconstructing statues using images of different focal lengths (24mm and 100mm). to reconstruct object in 3D by image geometry (PIMs).
Download
You can find this dataset at [1](https://micmac.ensg.eu/data/zhenjue_dataset.zip) Once you have downloaded it, you have to unzip the ".zip" archive.
Tutorial
1) Project creation and Image Importation
First and foremost, open MicMacRoom and save your project, you can then use the File > Import Images to import the images from the dataset. Then select all of the nodes in the graph editor and delete them all.
2) Base Element
To allow MicMacRoom to work we need to specific nodes at the beginning of the pipeline. These are: CameraInit which will recover the image information from the camera and MicMacProject which will create the directory. To add a node, place your cursor in the graph editor, right-click and select the node you want, either by searching the list of by doing of search by keyword. CameraInit is placed first and MicMacProject second. You can then take the SfmData output of CameraInit (Output are located on the right of a node) and link it with the SfmData input of MicMacProject (Input are located on the left of a node), if you see a line between the two nodes, then you have succeeded. You can also check the MicMacProject node and left-click on it to see that the SfmData parameter now has an address. If you have created a wrong link, you can delete it by pressing right-click and remove on it.
3) Relative Orientation
TapiocaAll
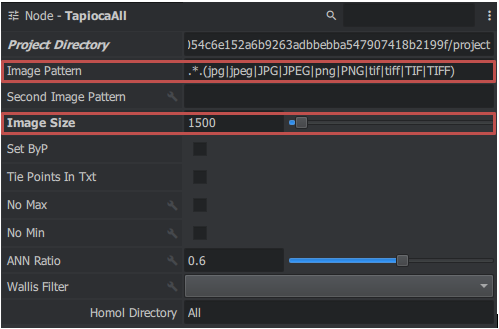
To search for attachment points, use the TapiocaAll node (use Tapioca with All commands authorized) to access them by right-clicking in the "Graph Editor" window > micmac > tapiocaAll (or right click in the "Graph Editor" window and type the node name in the search bar at the top) you get a block. Then link the MicMacProject Project Directory to TapiocaAll. You change the Image Size settings which define the resolution of the image (how high we want our resolution to be) and the Homol directory to set the output name of the file. This block allows you to calculate the connection points for all images in a given resolution.
tapas
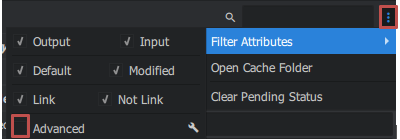
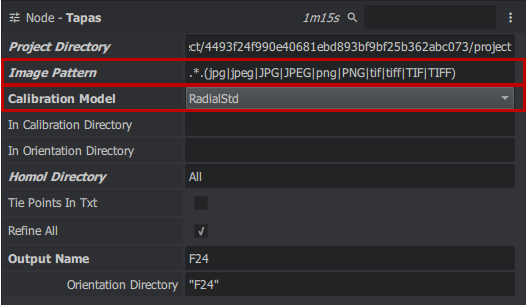
For this dataset, the images have different focal length, so we first need to calculate an orientation for the 24mm focal length images. to click to access it right in the "Graph Editor" window > micmac > Tapas you obtain a block. Then link the Project Directory, Image Patern, Homol Directory of TapiocaALL to Tapas you modify the Calibration Model parameters on RadialStd and you must go to the avencer parameters (node -tapas at the top right click on the 3 small dots > Filter Attributes > check Advanced) then choose in Ec Init max 30 and min 20
tapas_2
Check residual and number of points used per images. We use the 24mm orientation as an entry for our command in order to indicate to MicMac there is different focal length: to perform this action we will take the tapas node to access it right click in the "Graph Editor" window > micmac > Tapas you get a block. Then link the Project Directory, Image Patern, Homol Directory and Orientation Directory put it in In Orientation Directory from Tapas to Tapas_2 you change the Calibration Model settings on RadialStd
image
AperiCloud
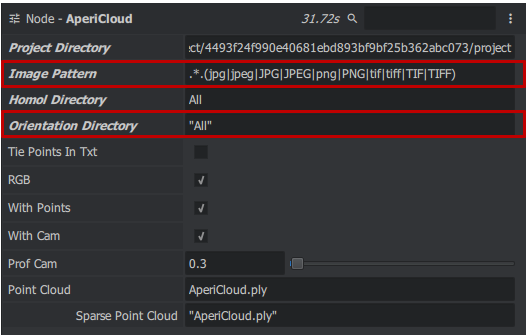
We will now generate a sparse cloud to visualize the relative orientation. To carry out this action we will take the AperiCloud node to access it right click in the "Graph Editor" window > micmac > AperiCloud you obtain a block. Then link the Project Directory, Image Patern, Homol Directory and Orientation Directory of Tapas_2 to AperiCloud no changes to be made to the parameters
SaisieMasqQT
To set a mask for dense correlation, use CommandMasqQT. Here we establish a 3D mask: To perform this task, navigate to the SeizureMasqQT node. Right-click in the "Graph Editor" window > micmac > SaisieMasqQT to generate a block. Then connect the Sparse point cloud to the file path and both directory projects, from AperiCloud to SaisieMasqQT, with no settings changes needed.
C3DC
The new C3DC tool works without requiring a master image for 3D reconstruction. To complete this task, follow these steps: First, navigate to the C3DC node by right-clicking in the Graph Editor window > micmac > C3DC, which creates a block. Then, establish the connections as follows: Output file to Masq 3D and the two projects directory from SaisieMasqQT to C3DC. Next, adjust the settings in MicMac: in Image Pattern, set "DSC_313[2-9].JPG", go to advanced settings, check Custom ZoomF and set Zoom F to 4. Finally, in Output Name, set the output file wish. name.
